A small Consolidation of some very useful tips
Here are some tips that might save you a lot of time and effort.
Steps in Building a GO APP
# Create a new directory for the project
mkdir qduck
cd qduck

# Initialize a new Go module
go mod init qduck

# generate code using Claude and paste into main.go
touch main.go

# Add dependencies
go mod tidy

# Build the application
go build -o qduck

# Run the application
./qduck
Remote Port Mapping
sudo ssh pari@localhost -L *:8080:10.0.4.32:80

// this will map remote port (80) of 10.0.4.32
// to port 8080 of your localhost on all interfaces

// if you want to expose this port 80 again to the outside world
// use a tool like ngrok or emporter
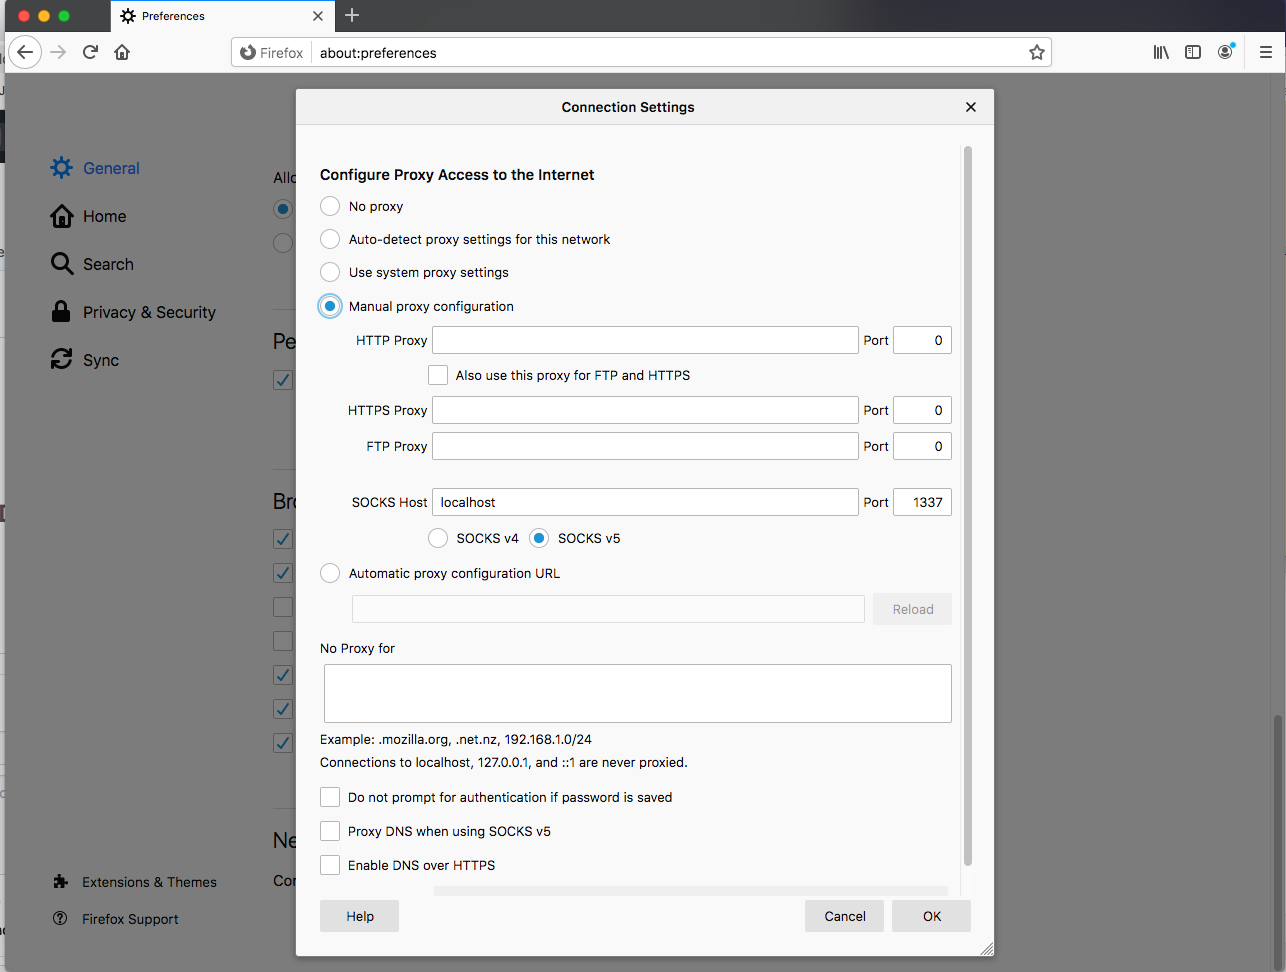
Poorman's VPN
In a terminal, do
ssh -D 1337 -q -C -N -p 2266 mySshUserName@MySSHServerIP
This will create a ssh tunnel to port 2266 to MySSHServerIP
and also opens 1337 on localhost for http proxy.
Use following Firefox Proxy Settings for browsing via VPN
Takes 1 min screenshots in a loop on osx (primary monitor)
while true;
    do current_time=$(date "+%Y.%m.%d-%H.%M.%S");
        screencapture -tpng $current_time.png;
        sleep 60;
    done;
List of My essential OSX Softwares
- OSX Settings
- Put dock to left and tap to click
- always show scroll bars
- Make sure your time zone is correct
- Show System date
- Announce time on the hour - download voices
- TurnOff Automatic updates
- edit .bash_profile
- Android Studio and Gradle and Java setup
- Alfred
- brew
- brew install wget
- brew install htop
- caffeine or Amphetamine
- Cyberduck
- Dbeaver
- Docker
- Firefox
- Google Chrome
- LibreOffice
- LiceCAP
- Magnet
- MicroSoft remote Desktop
- Notational Velocity
- Notion (??)
- Postman
- OneDrive
- Sequelpro
- SourceTree
- VirtualBox
- VirtualBox disk plugin
- Vagrant
- The Unarchiver
- VisualStudio Code
- VNC Client
- VLC Player
- jumpcut or flycut
- brew cask install jumpcut
- brew cask install nvALT
- More cask list at https://formulae.brew.sh/cask/
- sublime
- sublime license
- sublime cli shortcut
- sublime plugins
- -- Package Control, AllAutocomplete,
- Anydesk / Teamviewer
- TunnelBlick
Disk Partitioning using parted
The good old trusted fdisk fails when dealing with partitions that are larger than 2TB. You might want to you parted for creating disk partitions.
Firt you will use fdisk -l to get overview of situation
fdisk -l
Disk /dev/nvme0n2: 3298.5 GB
....
Choose a Partitioning Standard
parted /dev/nvme0n2 mklabel gpt
Now to create a primary partition that spans the entire disk
parted -a opt /dev/nvme0n2 mkpart primary ext4 0% 100%
Creating the file system
mkfs.ext4 /dev/nvme0n2p1
Renew SSL certificates using certbot DNS
apt-get update
apt-get install python3-minimal
snap install --classic certbot
export LC_ALL="en_US.UTF-8"
export LC_CTYPE="en_US.UTF-8"
apt-get install letsencrypt
certbot certonly --manual --preferred-challenges=dns -d *.mydomain.com
Your certificate pem files are now in
/etc/letsencrypt/live/mydomain.com/fullchain.pem
/etc/letsencrypt/live/mydomain.com/privkey.pem
How sessions work in subdomains
A detailed explanation of how http session work
with subdomains - explained with php code as example.
sftp-config.json for sublime sftp
{
    // SUBLIME SFTP Plugin config file , keep this file in which
    // folder you want to sync to remote prod/dev folder
    // sftp, ftp or ftps
    "type": "sftp",
    "save_before_upload": true,
    "upload_on_save": true,
    "sync_down_on_open": false,
    "sync_skip_deletes": false,
    "sync_same_age": true,
    "confirm_downloads": false,
    "confirm_sync": true,
    "confirm_overwrite_newer": false,
    "host": "$IP_ADDRESS",
    "user": "ubuntu",
    //"password": "password",
    //"port": "22",
    "remote_path": "/var/www/html/",
    "ignore_regexes": [
        "\\.sublime-(project|workspace)", "sftp-config(-alt\\d?)?\\.json",
        "sftp-settings\\.json", "/venv/", "\\.svn/", "\\.hg/", "\\.git/",
        "\\.bzr", "_darcs", "CVS", "\\.DS_Store", "Thumbs\\.db", "desktop\\.ini"
    ],
    "connect_timeout": 30,
    "ssh_key_file": "~/my_pem_files/myserver.pem",
    //"file_permissions": "664",
    //"dir_permissions": "775",
    //"keepalive": 120,
    //"ftp_passive_mode": true,
    //"ftp_obey_passive_host": false,
    //"sftp_sudo": false,
    //"sftp_flags": ["-F", "/path/to/ssh_config"],
    //"preserve_modification_times": false,
    //"remote_time_offset_in_hours": 0,
    //"remote_encoding": "utf-8",
    //"remote_locale": "C",
    //"allow_config_upload": false,
}
How to run some command , when content of a folder changes
#!/bin/bash

# Check if inotify-tools is installed
if ! command -v inotifywait &> /dev/null; then
    echo "inotify-tools is not installed. Quitting"
    # sudo apt-get install inotify-tools
    exit;
fi

echo "Starting to watch /var/www/mkdocs1 for changes..."
echo "Will run 'mkdocs build' when changes are detected..."

while inotifywait -r -e modify,create,delete,move /var/www/mkdocs1; do
    echo "Change detected! Running mkdocs build..."
    cd /var/www/mkdocs1 && mkdocs build
    echo "Build completed at $(date)"
    echo "Watching for more changes..."
done
CloudFlare Tunnels
Cloudflare setup to serve traffic of a website / webservice
from behind the firewall through cloudflare tunnel

Basically when a visitor pings our webservice domain name , the DNS
of the domain name is handled by cloud flare DNS ,
and it never points to our datacenter or app-running-node

the app-running-node does not need a global IP at all.

We install a piece of cloudflared on the app-running-node which
creates the tunnel between our node->cloudflare->end-users-browser

First make sure that cloudflare has the control of this domain
( add domain to cloudflare & point the domain's DNS to cloudflare DNS )

While adding domain I Opted for the monthly $20 plan

The following instructions are based on
https://erisa.dev/exposing-a-web-service-with-cloudflare-tunnel/


1. wget -q https://github.com/cloudflare/cloudflared/releases/latest/download/cloudflared-linux-amd64.deb
2. dpkg -i cloudflared-linux-amd64.deb

---- Next Step ---- #3 -----
root@multix:~# cloudflared tunnel login

A browser window should have opened at the following URL:

https://dash.cloudflare.com/argotunnel?callback=https%3A%2F%2Flogin.cloudflareaccess.org%2FGpGjl-Olhl822VqIlAXWE5cnsVQWuHNm_xE8oCdDcFE%3D

If the browser failed to open, please visit the URL above directly in your browser.
You have successfully logged in.
If you wish to copy your credentials to a server, they have been saved to:
/root/.cloudflared/cert.pem
root@multix:~#

-------- End of #3 Step -----
I have copied and pasted the URL on my laptop and approved 0 since on the
server node, it could not launch the browser on the server end.

In the cloudflare login (in the browser) select the domain name (to which you
want to create domain/subdomain https tunnel ) from the listed cloudflare
controlled domainnames (your domain names which are DNS controlled by cloudflare)

When you select the domain in the browser - it will take 10 to 15 seconds for
the browser to respond (dont double click during this time)
as it will communicate and pass some tokens to the cli-thingy that was asking
for browser login.

------ Next Step #4 ----

root@multix:~# cloudflared tunnel create mytunnel
Tunnel credentials written to /root/.cloudflared/50c9552f-6258-4c0e-a660-91250746d50f.json.
cloudflared chose this file based on where your origin certificate was found.
Keep this file secret. To revoke these credentials, delete the tunnel.

Created tunnel mytunnel with id 50c9552f-6258-4c0e-a660-91250746d50f
---- End of #4 -----

mkdir -p /etc/cloudflared

vim /etc/cloudflared/config.yml

# add the following content
tunnel: 50c9552f-6258-4c0e-a660-91250746d50f
credentials-file: /root/.cloudflared/50c9552f-6258-4c0e-a660-91250746d50f.json

ingress:
  - hostname: smilerewards.in
    service: http://localhost:8800
  - hostname: api.smilerewards.in
    service: http://localhost:8008
  - service: http_status:404

---- end of vim

----- Install Service / Starting service / view logs / tunnel info -----

# cloudflared service install
2022-02-18T12:55:30Z INF Using Systemd
2022-02-18T12:55:30Z INF systemctl daemon-reload

To start the tunnel
# systemctl start cloudflared
The first time i ran in on my datacenter, I got this error
        Feb 18 13:13:28 multix cloudflared[32819]: 2022-02-18T13:13:28Z ERR Serve
        tunnel error error="DialContext error: dial tcp 198.41.200.13:7844: i/o timeout" connIndex=0
        Feb 18 13:13:28 multix cloudflared[32819]: 2022-02-18T13:13:28Z INF
        Retrying connection in up to 16s seconds connIndex=0

        Feb 18 13:13:44 multix cloudflared[32819]: 2022-02-18T13:13:44Z ERR Unable
        to establish connection with Cloudflare edge error="DialContext error: dial
        tcp 198.41.200.13:7844: i/o timeout" connIndex=0

Basically, cloudflared was complaining that my firewall is not allowing creation
of outbound tunnel to 7844 port of cloudflare-cloud

Enable it to run at boot: # systemctl enable cloudflared
Disable it to run at boot: #  systemctl disable cloudflared

To check the logs of the service once it's running, issue # journalctl -u cloudflared
To check logs as stream # journalctl -u cloudflared -f

cloudflared tunnel info mytunnel

------ Finally Routing (below ) -------

Now that your tunnel is connected, it's time to get it routing!
Routing means actually making the domain or subdomain's traffic come here.

You can make cloudflared do for it for you.
As long as the domain you want to route is a subdomain of the one you selected
right at the beginning, you can issue
# cloudflared tunnel route dns mytunnel smilerewards.in

and it will make the record for you!

There is a manual way to do this routing through cloudflare admin panel
but who would want to do that

--- END OF Article --

# some other commands I found on the internet
cloudflared tunnel --hostname BLAH.example.com --url ssh://localhost:22